Thursday on the canopy.
A day with the Transit van, fetching stuff from Toddington and a trip to a builder's yard.

We need to get 10 roof sheets from store at Toddington. These are heavy duty, coated sheets, and we were warned that this thicker grade would soon no longer be available, so we bought in sufficient for the P2 building as well. We loaded them on to the Transit, parked by the old garden centre.
This is being taken apart, the T&G facing having already been removed in the picture.
Word also had it that the contractors had started on the crossover replacement at Toddington, so we wandered over to have a look.

And it's true, here they are dismantling the two turnouts in question. This crossover was completely worn out, being installed in the early days of the railway. It handles traffic from the main line to the loop, and from the main line to the loco yard entrance, a siding that runs parallel with the main line for some distance. It was once the up line in BR days.

Off we went to Broadway then, where we unloaded the 10 panels on to a platform trolley. Handy things those, and pleasingly heavy duty. Those roof sheets aren't light, that's the whole point of their robustness.

Once at Broadway there was the opportunity to record the progress made on Wednesday, with the help of the Broadway maintenance gang.
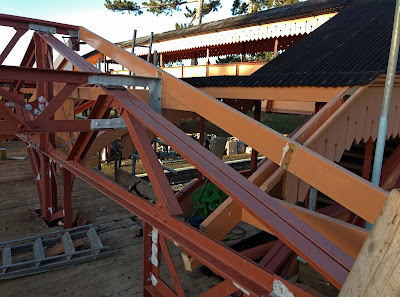
As you can see the dagger boards are on the Malvern side purlin, so the size and shape of the last part of the canopy is now quite clear. At the same time Neal shunted the boarding unit (fixed to a pallet and propelled by a pallet truck) back on to the new end, and attached this with bolts.
A start was also made with the woodwork supports that sit on top of the purlins.
On Thursday Neal continued with the frame of the end, as only one side was suitable for re-use by Neal with his pallet truck. The other side was a huge sheet of temporary plywood.
In the foreground you can see the other half of the A shaped framing that supports the boarding on the end.
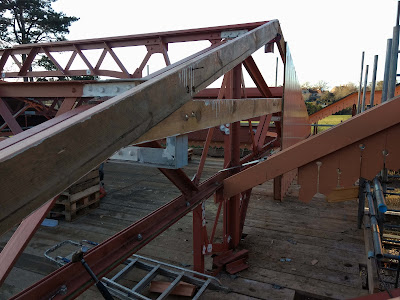
In this picture you can see the frame from the other side.
Where the roof sheet from the steps meet the A frame supported boarding there will be a valley gutter, and the supporting structure for that, in the middle of the picture, is something Neal still has on his list to do.
Having unloaded the roof sheets, we took the Transit to a builder's merchant to fetch some moulded boarding, which will go around the edge of the roof with the gutters.

This is all raw wood of course, so once again the process started of knotting, priming and painting. We got as far as the priming on Thursday
What with the shuttling around with the Transit we only had the afternoon to do any work on the canopy.

The sun was soon going down, now around 4 o'clock, and it started to feel really cold. The forecast was for quite a sharp frost on Thursday night.

If you look carefully at the two above pictures, you can see the wooden supports laid on top of the 3 purlins here. They have had an angle shaved into them that equals the angle of the roof sheets, so that they sit comfortably. They still need bolting down though.
The day of mounting roof sheets is getting nearer.
Friday on the canopy.
Having got a supply of thick, corrugated iron roof sheets on Thursday, we took delivery of the glazing for the canopy on Friday.

We spotted the van arriving down below, and sent him round to the southern entrance, where we were able to back him up to the platform.

Here we got one of our two restored 4 wheeled platform trolleys to receive the glass. The driver very kindly lent us a frame on which we could securely store the panes.
As you can see, they have a special greenish hue, which characterises them as turn of the last century. They are also laminated, the modern bit. But you can't see that from underneath.
Neal then got cracking straight away, he really had the bit between his teeth today. You see him below cutting one of the timbers that will support the glazing bars in the centre of the canopy.

Meanwhile, John was busy screwing down those same timbers on to the purlins, while as a second job today he had the replacement of basic nuts with Nyloc fasteners, which can't shake loose.
 |
| Either rivets, or Nyloc fasteners around the truss. |
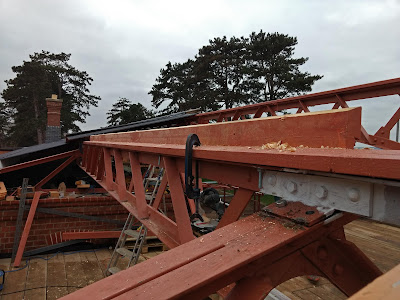
This picture shows the timbers that Neal was cutting, and John bolting down on the purlin.
Note the angle cut into the top timber. This is the same as the line of the roof.
While you can see one corrugated iron panel above another in the background, here on the canopy over the steps there will be glass on both sides of the ridge purlin.

With the timbers for the roof sheets and glass cut to size, Neal moved on to the fascia board on the car park side.
Here he is fitting 'soldiers', the little uprights along the fascia board. These hold a longitudinal timber top and bottom, to which the gutters and dagger boards are attached.
It was too cold for lunch on the balcony today. The night was the coldest yet, down to minus 5 decrees C.

We sought refuge in the mess hut, where it would be warmer.
Wrongo.... it was freezing cold inside too, and an icicle had formed under the gently dripping tap. We think that is a first for Broadway.

Back outside. Yours truly on rust proofing (the steelwork was painted after manufacture, but has got a bit bashed about with its several removals about the site at Toddington, and craning into place) as well has painting the mouldings that go under the gutters along he dagger boards.
Neal was trial fitting a valley gutter for the angle between the roof of the steps and the end of the canopy.

As it was getting darker, we took this picture of the car park side fascia board. The supporting timbers have been completed, primered, and most of the dagger boards here are also on already.
We think we will be fitting the first of the roof panels some time next week.

At the end of the day, Neal had a poser for our blog readers: How to you balance all these nails on the end of the upright one?
Answer next week!
Hold the nail that is stuck in the wood so the wood is uppermost, then place the loose nails on the wood, standing on their heads? Don't try it when you are shivering!
ReplyDeleteNo, Neal had something better in mind. He did it on the spot (in the cold) but the picture is for next week ;-)
DeleteWow, Jo. This is going much faster than I envisaged! The weather forecast is looking pretty favourable for the next week or so: at least dry and calm, but maybe chilly. The quick progress is testament to the careful construction and planning that went into the steel and woodwork over the last year or two! Excited to see the end result in the Spring.
ReplyDeleteBind the nails together with tape and place one of the nails out of synch with the length of the others together. then balance this on the upright nail.
ReplyDeleteSuper progress ! Looking forward to seeing the glass and corrigated sheets go on.
Regards, Paul.
Tape??? That's cheating :-(
DeleteA fine and informative blog.
ReplyDeleteCreate a flat lattice that is self supporting by overlapping the nails in a certain configuration. Rest the lattice centre on the nail head. It must be something like this but how? Over to Neal,
ReplyDeleteYour on the right track keep going.
DeleteNeal