Thursday at Broadway.
Free of Covid at last! The last LFT was negative, so no more lounging at home with the paper and writing articles. It wasn't really a big thing, we felt slightly feverish, a dribbly nose for a day or two, and that was it. All thanks to the vaccinations we've had. The last 3 days were spent at home still, feeling well now, but still with a positive test - until yesterday. Phew! The whole process took nearly two weeks, from infection to the last, negative test.
So what's been going on? Mostly guttering and shuttering.
 | |||

Both downpipes along our replica 'cast iron' posts have been installed. There's just the little connection at ground level into the gulley to go. Luckily Neal had all this in mind when the site was bare, and the drains are in there, underground.
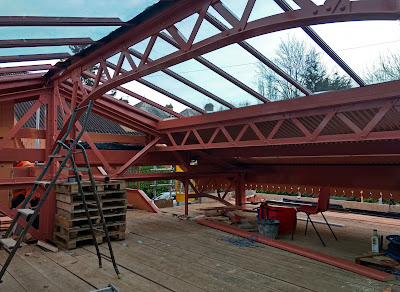
The arched ridge purlin in the middle has been drilled in the middle to accept the 'gas' pipe, to which the big hex lamp will be attached. Conduiting is ready to be built into runs to supply it from the station building.

As you can see here many of the end daggerboards are already in place, and work is going on to fit the guttering, which will come in from both sides, stop, and then run down along the posts, just visible in this picture.

Here Neal is sawing a big round hole so that the gutter on the right can be routed through the dagger boards to the downpipe behind.

How's this for a trial fitting? It gives you an idea of what it will look like when it's all bolted up.
The route of the gutters is carefully calculated with a level to make sure that it has a fall.

The next job was to lay in a sheet of lead into the valley gutter. As Neal explained, it will have 3 layers of waterproofing - the lead sheet, the steel former underneath, and finally a waterproof membrane. That should hold it!

The dark stone timber in the upper picture was used to help shape the lead sheet, and is temporary. After a lot of beating with a plastic mallet, the finished sheet looked like this.
We then had an intermezzo, as our supplier of aluminium profiles constituting the replica GWR style glazing bars came with a second delivery. This is not for Broadway, you will be surprised to read, but for Toddington. Yes, Neal has been awarded the honour of being 'volunteered' to replace completely the glazing on the original Toddington station, which is life expired.

Nearby, the old garden centre buildings were being taken apart by a team of contractors. Recognise the place? Well, it was just a collection of wooden huts on wooden platforms.
 |
| The Malvern end being taken down, and materials sorted into usable piles. |
 |
| Glass canopy at the Cotswolds end. |
 | |
| Our men from the S&T connecting the new turnout to the box. |
After unloading the new glazing bars, we had a quick look at the progress made by the contractors on the new crossover installed at the southern end of the loop.
We can report that the job is complete, and the contractors have left.
The job involved the laying of two completely new turnouts, front to front, here seen between the nearest and farthest yellow lines.


Another piece of news is the placing of the Frome yard lamp, here seen on the right.
It will light up the path to the water tower, as well as the path to the lighting up pile, which can be seen behind it.
A replica lamp top, the same as the one on the left, is on order.

Another interesting find is this cast iron bracket. Know where it's from? It's actually from the canopy over the entrance to Winchcombe station. Neal and his team will be rebuilding this next after Broadway is done, and as two such brackets were never fitted since they were damaged during the build in 1990, one has been taken off so that we can find, or commission, two more. Then the entrance canopy can be restored to its original length as at Monmouth Troy.
Interesting little fact: The upper part here is thicker than the rest as it contains a channel for rainwater to be piped to the gutter! Notice that the slope for the corrugated iron sheets that make the roof is curved. Tricky wrinkle, but we think we can handle this. (NB in the picture the bracket is upside down)
Back to Broadway for lunch then.

Here's a shot from underneath to show the glazing sheets fitted, with just two each left on the end to allow for work on the apex from outside.
 |

The above shot is to show the mousehole through which the downpipe will pass, and the lengthening dagger boards where the footbridge steps meet the canopy.
Above is the valley gutter, being shaped to enter the black guttering on the right.

From the outside, this summary shot shows the last section of the canopy now pretty much in place. Try to imagine away the scaffolding, as it obscures the effect of the glazed circulating area that will appear underneath.

Last picture for Thursday is this shot by Broadway volunteer Phil, who popped by on a day we had off, unfortunately. But it's a brilliant shot that he did, which illustrates well how four more panels of glazing need to be fitted, and the rest of the dagger boards on the end.
Friday at Broadway.
Cold and bright, but the forecast for Sunday is dire - lots of rain.
Work today therefore concentrated on getting the roof closed up and as watertight as possible. We had 4 panes of glass left to place, the associated lead sheets and finally the small sheets of corrugated iron on the end.

The first few hours were spent by Neal and John in shaping the last couple of lead sheets - one over the top, and two more facing downhill, left and right.
The sheet is roughly dressed off site, lifted into position (it's floppy and quite heavy) and then gently beaten into shape to mould itself tightly into position.

The majority of the glass panels were already fitted (while yours truly was languishing at home) so we missed that. But today there was a re-run with the last 4, so here is a picture for you. Can't show you the whole process, as it took 3 of us to gently lift each sheet into position. They could crack, or worse still, slide off down the roof and onto the deck 10 feet below.
Note the deep green colour, when several sheets are stacked.

Here the sheet then is in place. There's a little catch at the bottom of the glazing bar, which stops it sliding down. The sides are held in place with an aluminium strip, which has to be clicked into position all the way along, which is what Neal is doing in the picture.
A spare panel comes with the order, but we didn't need it - no breakages from this team!

At the top of the glass pane is the lead sheet that wraps around the 'mop handle' along the apex. The bit sticking up is a lead strip which is nailed to the mop handle at intervals, and which, once the lead sheet is placed on top of it, is folded back upon itself, and in that way it holds the top lead sheet on.
How does Neal know all these things? He's not a builder... but he is very experienced.
Originally in 2017 the glazing company both supplied and fitted the glazing, but this time said they could only supply. So we did it. Then we contacted the roofers who fitted the lead flashing, but they did not answer our call, so we did that ourselves too!

Ad interim, here is another sideways shot which shows all the glazing now in place (about lunch time). You can see where the last sheet of corrugated iron needs to go.
The complete run of dagger boards is also in place here.

Here's a similar shot from the other side. In this picture the last sheet has already been fitted. There's still a gap on the end where not all the boarding has been fitted.

A small but important job today was also to treat the fitted lead sheets to a polish with pattination oil. Every heard of that? We hadn't, but are now experts! If you do not rub this oil into the lead, it gives off nasty white streaks over time. Doing that was strangely satisfying, like rubbing leather food into a horse's saddle. The lead, a metal of course, seemed to absorb it gratefully.

The last corrugated iron sheets are not quite perfect in this picture, but will be rain proof for a while (i.e. Sunday). But what the picture shows is the near completion of the end boarding. The dark stone timber is not part of the assembly, but was simply used to achieve a straight bottom edge.

At the end of the afternoon there was time to fit three sheets back over the top of the staircase. All nice and snug now.

Our final shot of the day shows those three sheets in place, thus making the intersection between staircase and canopy end water tight.
The end of the valley gutter still needs sorting out. We are thinking of fitting a collector here, so that the water from the valley gutter enters the normal gutter below in an organised way.
The construction of the last part of the canopy is now approaching its conclusion. We are actually ahead of schedule. The guttering needs finishing off (mainly on the car park side, John just about finished the Malvern side today, and this now works). Some sort of return needs to be added to the end of the corrugated iron, and we need to finish off the lead at the very end of the gable. This is currently only loosely fitted. And then there is still a lot of painting in topcoat around the inside, but this can now be achieved in the dry, so we're no longer afraid of a little rain. It is February after all, but by March we will be out of here.
Wonderful blog Jo. So glad that you have returned to the job(s).
ReplyDeleteRegards, Paul.
Good to hear that you are all clear Jo, Thanks again for an excellent report and pictures, we are so looking forward to March as we are desperate for an intake of steam and smoke! We worked it out that is two and a half years since our last visit! Also getting excited to see all this handiwork in real life.
ReplyDeleteGreat work every one of you in the teams.
Regards
Paul & Marion
Wow what Mangnificent work Gentlemen - it is a credit to each and every one of you especially Neil. Steelway Fensicure will want you all as full time employees!! I am quite convinced that not only have you saved a fortune by doing it yourselves because you care about the detail you will never have to revisit your work.
ReplyDeleteSo what is next? Will you finish the footbridge first and then go and do Toddington and Winchcombe or the other way around? I am excited at the prospect of starting Platform 2 as well and look forward to seeing it all in the flesh at Easter possibly.
Congratulations Regards
Richard
Good to know that you're back in the land of the living, Jo. What a schlep, and just when you least needed it!
ReplyDeleteGreat update, loaded with fine detail. We're all waiting for the 28th with baited breath! Huge well done to you all.
This comment has been removed by the author.
ReplyDeleteExcellent update. I'm particularly loving the use of the Royal "We" at the start of the blog! I presume that exactly the same procedure will be used for Platform 2 when you build the waiting room on that side (as historical photos of Broadway Station seem to suggest).
ReplyDeleteTed Our outline plan for platform two shows the gable end of the building above the base of the steps as original. There will be the maximum amount of preparation on the roof structure before we start. Because the scaffold blocks the run round loop calling for top and tail operation. With the fascia board, guttering and bottom run of sheets fixed, so the scaffold can be cut back to allow use of the run around.
DeleteNeal
Jo. Great to see you back in full form and thanks for the update. It's so close now! Magnificent work by all involved - the canopy extension is going to be quite a sight with its large lantern in the middle. I was interested to see the "new" RRV obtained from Swanage. This looks like it would be ideal for moving materials onto Platform 2 when you start construction there!
ReplyDeleteVery good work at Broadway. And good work on the permanent way, too - it's nice to see brand new turnouts in bullhead rail.
ReplyDeleteA great blog...thank you.
ReplyDelete